Learning is....
Planting a seed in our brain... learning to water, nurture and grow it.... so we can live on the fruit of our learning and plant more seeds.

Tuesday 28 November 2017

I may be the teacher, but I am on a big learning curve every day!!!

I've been a teacher for nearly twenty-two years, and that is a pretty long time considering we are hemorrhaging teachers at the five year mark in their career.  I've mostly taught between Year 3-8 and I am comfortable having multi-leveled classes.  As I've said in a previous post, my philosophy was that I did not teach students who did not know how to tie their own shoe laces, pack their own bag, blow their own nose or dress themselves.

Which is why a few people, including myself, are slightly amused to see me as a New Entrant teacher this term.


I decided to go for this role as I really liked the school, the staff and the students, and I thought it was high time I stretched myself professionally and got outside of my comfort zone and learnt how this New Entrant teaching thing was done.  Mixed into that, I wanted to explore play based learning as a philosophy.

And boy, am I learning a lot!!

I am the first port of call in teaching these things:
  • sitting on the mat
  • not disappearing out the door
  • coming into class when the bell goes
  • taking turns
  • listening and following instructions
  • how to stick things down
  • how to use a paint brush without going through the paper
  • colouring in between the lines
  • how to cut stuff out
And all of this is before we learn to read or write or master the alphabet!!!

Apart from those old standards of "Walk, don't run" or "Keep your hands to yourself", I've added such stunning phrases to my standard fare as "We don't put the toys/pens/pencils in our mouths" and "Your feet do not go in your lunchbox".  I think I talk too much because I am losing my voice every day.  For my personal health and safety, I will need to find a way to modify my practice to save my voice.

I'm also having a fast learning curve on Autism too.  I've had students with Autism before, but every child is unique and has their own peculiarities, talents, challenges and delights.

I have a wee girl with Autism and sometimes she is willing to do what we are doing and other times I have to try my best to coax her and find ways and means of her wanting to be included.  She gets high anxiety.  Today it was over a spider being in the girls toilets; the other day it was because a certain person looked at her.  Dad and I had a meeting the other week where I let him know the issues happening and got some feedback from him on how they manage the anxiety and other issues at home. 

Sometimes I can de-escalate the anxiety; many other times I fail.  And now she has a taste for fleeing the class when she does not want to do something.  I do not have a teacher aide in the room for her (still doing the paperwork for ORS), so occasionally, when the admin team do not answer their phones, I've had to leave my class on their own to stop her from disappearing down the road. 

So I need to find another way of keeping her inside that doesn't include having to have the doors constantly shut.  Fencing for the New Entrant/Year One classes won't be done until next year to accommodate another student on ORS funding, who is also a flight risk.

I'm thinking of introducing a safe cave for her as she is light sensitive.  But the challenge is in making it a space for her and not having every other child invade it.  I'm also thinking of creating a form of recognition for her participating in whole class activities and staying in class.  I've set up a similar one for two other students who sometimes struggle to show respect and participate appropriately.


Each row represents first, middle and third blocks of learning.  The first box in each block is mat time.  The second box covers any activities we do and Play Exploration time.  The third box covers packing up time.  If I get no issues, the child gets a star for their box.  The child gets a verbal warning if an undesirable behaviour happens.  If the behaviour is repeated, the child receives a dot under the box.  If no further warnings happen, they get half a star for that time.  If they get a second dot, there is no star for that time.  If they get four dots they go to time out in another room.  I photograph this each day as a record.  One child's parent is emailed the photo each day as she wants to monitor in-school behaviour to ensure learning progress can happen.

So I am thinking of adapting this to my wee girl.  A box for mat time, a box for doing the activity, a box for tidying up (she hates that time the most), and a fourth box for staying in the classroom.  Now to put it into action!

The ORS student is in my room too.  I've had an ORS student previously, but again, each one is an individual and has their own challenges and delights.  This student is non-verbal and it is a challenge to find a way to include him into class activities as he is functioning at such a low level intellectually.

I want to explore how we can provide the best learning for this boy as he will never be in a position to participate at any level in a mainstream programme,  I feel that I am not quite equipped to provide what he needs, and neither is the school (despite doing its very best to provide spaces and personnel and support to all involved) even with a special school teacher onsite three mornings a week.  So I want to explore what other options are available to him to grow the potential he possibly has while allowing him to attend a mainstream school as his family wish for him.  So I'd really value any suggestions in the comments.

Over the last few weeks, I've had my CRT days.  This has been really valuable for me.  I've learned about the testing at this level that I've never had to do with older children.  JAM, for example, is new to me, as is how to administer and assess Marie Clay's Letter Identification and Dictation tasks.

But it has also given me the chance to spend time one-on-one with each child and talk to them and learn where they are at, what they know, what their gaps are.  This is great because it then means I have to up my game and change how I do things, tweak stuff, to ensure they are clicking with the alphabet and numbers and sight words and so on.  So I've spent a bit of time talking to the teacher in the next room and my cousin, the RTLit, on how I can do things a wee bit better.

Every day is a learning curve.  What happened well yesterday or this morning may not work during the next block.  The children reacted poorly to hot weather last week and were like wilting plants in the afternoon blocks with barely the energy to sit.  This has been another added challenge and something to consider when planning the day.

I am sure that the next two weeks and four days will bring further lessons for me as the teacher.


Saturday 11 November 2017

Teaching New Entrants: Focusing in on a letter

I usually have a lot of balls in the air when I am teaching my normal age range.  It's all part of keeping everyone engaged.

With new entrants, they do not have a terribly long attention span.  Some of our projects are things we complete in one session, and some, I am teaching them, you have to revisit.

Because I only have these students for nine short weeks, rather than doing Letter of the Week, we will make a letter last two to four days depending on the activities I come up with.  We have an Art Week coming up, so I am also using these activities as an opportunity to teach the children some skills:
  • how to spread glue to stick something down
  • how to use brush strokes for paint and dye
  • spatial awareness
  • critical viewing
  • observational drawing
  • colouring in within the lines
  • printing
And I find that you need to do these skills over a variety of different projects so the students get the opportunity to repeat the skill and apply it to different activities.

I've been collecting ideas for working with NEs for a while.  And after I secured this position, it went into overdrive.  So I have three Boards on Pinterest that most of my ideas are coming from:

The first letter we focused on was the letter B.  I decided we would start off by using coloured paper and glue to construct a bear head.  So I had a look on Google images for a bear head to use as inspiration.

Visit this website for this and more bear clipart:  http://clipart-library.com/free-bear-pictures.html 

I then cut out a head, ears, a muzzle, nose, eyes, pupils and patches for the ears.  We used PVA glue to glue the bears to coloured paper.  I wanted the children to use fingers to apply the PVA to teach them that brushes were not used for gluing - it wrecks brushes and makes them no good for painting.  When they were dry, I showed the children how to draw the mouth on to the muzzle.


We also went outside to blow bubbles as part of our B focus.  I took lots of photos and the children told me their stories to go with a photo of them.  These photos and stories are in our Letter Book.


This is our letter book.  We brainstorm the focus letter words and I type them up and add corresponding pictures.  We also have a poem (thanks Pinterest) that goes with the focus word.


Next we made the bees.  I cut out a bee body and the children glued on the stripes and eyes.  We let them dry.


When we came back to them we glued on the legs, antennae and proboscis, which took two goes and we weren't successful with PVA so had to use the hot glue guns.


Then I made a flower for our bees.  I cut the centre and petals out from scrapbooking paper.  I stuck them with blutack to the cupboard doors.


Sheryl, in the class next door, suggested using handprints to make the frilly bits of the flower.  So I mixed up some pink paint and painted each child's hand to make three prints each.  We did this one child at a time.  Of course, it also brought up some good oral language as we did this.  We talked about how the paint felt cold, the brush tickled and how to place the hand.


A parent cut out all the handprints for me and I was able to blutack the hands to the flow on the cupboard.  The children and I had also hot glued on the wings, made of golden cellophane, to the bees.  I then added the bees to the flower with blutack too.


And this is how the cupboard came up with our bees flying around the flower.  You can also see a copy of the letter B brainstorm we did.  There is a larger copy in our Letter Book.


And this is our B corner! I love how colourful it all is.


Next we did the letter A.  We had already learned about ambulances, thanks to Daniel the paramedic who taught the kids about how to call 111 in an emergency and what an ambulance and paramedics do.  So we had that nailed.


We brainstormed a whole lot of short A words and I typed them up and add pictures to go in our letter book.  We also have a poem (thank Pinterest) to go with it.  The kids are loving this.


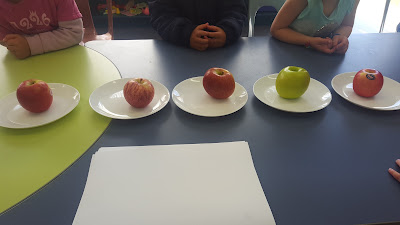
I bought five different variety of apples.  We looked at the apples.  We discussed the apples.


We then drew the apples with pencil and coloured them in with crayons.


Then we made apples (thanks Pinterest) with coloured paper and PVA - yes, I prepared everything first.  I also do the activity with the students so they have a model to follow.


I've since mounted these artworks and put them on the wall.


Our next focus letter is the letter T.  Once again Pinterest provided some inspiration and we made turkeys.  I pre-cut out all the necessary parts and demonstrated how to make the turkeys.  As you can see, we had varying success or individuality.


I tweeted this picture out, and then someone tweeted back: taniwha, tui, tiki, tuatara!!!

Well we couldn't do all of them but we did do this:


I looked up taniwha images on Google and drew a taniwha on two pieced of A2 cartridge.  I then did the outlines in crayon.


The children then coloured in different sections of the taniwha each.


The next day we used blue dye to make it look like the taniwha was swimming in water.


With the tui, I again drew it and outlined it with crayon.  Then each child had the opportunity to colour in a section.  As you can see below, we then dyed the picture.


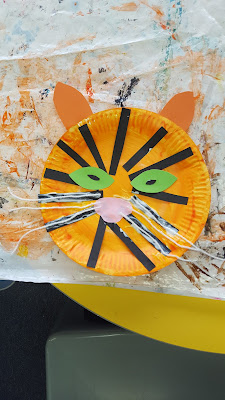
We also have been making tigers.  On the first day we painted a paper plate on one side orange.  The next day we painted the other side of the paper plate orange.


Then I prepared the things we would need for the tigers face.  I cut out orange paper for the ears.  I cut out green paper for the eyes and smaller black paper for the pupils.  I cut out lots of black strips of paper for the stripes.  I cut out pink noses.  I cut a lot of white wool for whiskers.  I also printed out a picture of a tiger's face.

Source:  http://fortune.com/2017/02/23/tiger-drone-hunt/ 
Naturally I demonstrated this.  We started off by putting some white crayon on the face for the white patches.  Then I demonstrated puting on the ears, the stripes, eyes and nose.


Full disclosure:  this is mine and the container of bits I prepared earlier.


Once again, you will notice amazing individuality and differences between each tiger.

We also went outside and looked at trees, discussed trees and drew trees.


Yes, this is mine.


Next we did the letter S and those activities (while finishing off our tigers).  I bought strawberries to observe, talk about, draw and eat.  I got cotton balls so we can make sheep.  We planted sunflower, pea, basil and coriander seeds into seed raising trays and some sweetcorn plants directly into the garden (which we also sketched).  And I envisaged letter S snakes.


We discussed the parts of the strawberry.  We noted the green hat on top.  That's where we went out to the gardens to look at the strawberry plants and see the flowers and the strawberries growing in the garden.  We went back inside to look at the strawberries again and noted the stalk, the seeds and the colour and shape.  We then sketched in pencil and used different crayons of reds, white and greens to colour in the strawberry.  I made the paper A5 size and asked them to draw big.


For the S snakes, I drew the S on an A3 piece of cartridge, and then demonstrated making a pattern after drawing "a fence to colour inside of" (I did an outline).  Each child choose their colour to outline their S and I did the outline and they then did their patterns inside.  This is still a work in progress.


For the sheep, I drew a white "cloud" outline with a crayon on each piece of blue paper.  We sat down together and I demonstrated drawing the head and ears and colouring it in.  Then I showed them how to do the legs.  Afterwards we had several different greens to do grass.

Then I demonstrated using my finger to put glue on the paper.  I demonstrated putting a cottonball on the sheep's body.  I asked them to go all around the outside first and then fill in the middle.  We ran out of cottonballs.

The second day I showed them how to put a face on the sheep and then we glued on the cottonballs until we ran out again.  So yes, a third session with cottonballs will be required.


I have a lot of spare seed raising trays and pots, so I pulled out enough for one each.  I demonstrated putting the seed raising mix into the trays and pots.  As we planted each seed we looked at it and discussed its size, shape and appearance.  We talked about what a seed needs to grow.


We have just started learning about the letter D, so I see dabbing dots on a 'd', dragons and dogs in the coming days.  And maybe donuts or dragonfruit.... anyone know where to buy dragonfruit in Hamilton?