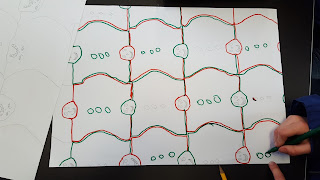
So here is how we did it, and I think these kids were brilliant with their watching, listening and then following the instructions. The one pair that mucked up their first attempt were able to use the feedback to have a successful second attempt and then they were flying.
First of all I cut out of cardboard a square for each pair of children (if it was my own class we would do individual posters), 10x10cm. I demonstrated to the children how to label the top and bottom of the square with the letter A, and the left and right sides with a B. After that I showed them how to draw a simple shape to cut out of one A side and one B side and then sellotape them onto the opposite side - A with A, B with B. You can see that in the photo below.
I then demonstrated putting the new shape on the paper, tracing around it fully, then moving the shape over, aligning it with the first shape I traced and tracing around three sides. I then repeated this until the whole page was a repeated pattern right to the very edge of the page.Below, you can see the children's work and them doing this process themselves.
Afterwards I showed them how to turn their shape into something. Most did monsters or the like. My partner choose a clown for us to do. I think demonstrated how to use felts to draw around each shape to make a pattern and then colour in with jovis (let's not waste felts with colouring in).
As you can see below, my partner and I were an efficient team. Most of the students, who were Year 3/4 were doing very well with this task. The only issues were one group of girls didn't cut out their A/B shapes properly and had to start that again, but they flew with the task after that, and a group of boys didn't understand the concept to not colour everything the same.
This is the finished one that I did with my partner. Sorry about the upside down pictures, but I think you understand the concept.
Obviously some children did not quite finish on the day, but I think they came a long way on the day and their work was fabulous. When Sarah, the teacher, returned at the end of the day she was very pleased with the progress and how well the students had listened. I really enjoyed teaching this mini unit of work to this class.


No comments:
Post a Comment