With new entrants, they do not have a terribly long attention span. Some of our projects are things we complete in one session, and some, I am teaching them, you have to revisit.
Because I only have these students for nine short weeks, rather than doing Letter of the Week, we will make a letter last two to four days depending on the activities I come up with. We have an Art Week coming up, so I am also using these activities as an opportunity to teach the children some skills:
- how to spread glue to stick something down
- how to use brush strokes for paint and dye
- spatial awareness
- critical viewing
- observational drawing
- colouring in within the lines
- printing
I've been collecting ideas for working with NEs for a while. And after I secured this position, it went into overdrive. So I have three Boards on Pinterest that most of my ideas are coming from:
The first letter we focused on was the letter B. I decided we would start off by using coloured paper and glue to construct a bear head. So I had a look on Google images for a bear head to use as inspiration.
 |
| Visit this website for this and more bear clipart: http://clipart-library.com/free-bear-pictures.html |
I then cut out a head, ears, a muzzle, nose, eyes, pupils and patches for the ears. We used PVA glue to glue the bears to coloured paper. I wanted the children to use fingers to apply the PVA to teach them that brushes were not used for gluing - it wrecks brushes and makes them no good for painting. When they were dry, I showed the children how to draw the mouth on to the muzzle.
We also went outside to blow bubbles as part of our B focus. I took lots of photos and the children told me their stories to go with a photo of them. These photos and stories are in our Letter Book.
This is our letter book. We brainstorm the focus letter words and I type them up and add corresponding pictures. We also have a poem (thanks Pinterest) that goes with the focus word.
Next we made the bees. I cut out a bee body and the children glued on the stripes and eyes. We let them dry.
When we came back to them we glued on the legs, antennae and proboscis, which took two goes and we weren't successful with PVA so had to use the hot glue guns.
Then I made a flower for our bees. I cut the centre and petals out from scrapbooking paper. I stuck them with blutack to the cupboard doors.
Sheryl, in the class next door, suggested using handprints to make the frilly bits of the flower. So I mixed up some pink paint and painted each child's hand to make three prints each. We did this one child at a time. Of course, it also brought up some good oral language as we did this. We talked about how the paint felt cold, the brush tickled and how to place the hand.
A parent cut out all the handprints for me and I was able to blutack the hands to the flow on the cupboard. The children and I had also hot glued on the wings, made of golden cellophane, to the bees. I then added the bees to the flower with blutack too.
And this is how the cupboard came up with our bees flying around the flower. You can also see a copy of the letter B brainstorm we did. There is a larger copy in our Letter Book.
And this is our B corner! I love how colourful it all is.
Next we did the letter A. We had already learned about ambulances, thanks to Daniel the paramedic who taught the kids about how to call 111 in an emergency and what an ambulance and paramedics do. So we had that nailed.
We brainstormed a whole lot of short A words and I typed them up and add pictures to go in our letter book. We also have a poem (thank Pinterest) to go with it. The kids are loving this.
I bought five different variety of apples. We looked at the apples. We discussed the apples.
We then drew the apples with pencil and coloured them in with crayons.
Then we made apples (thanks Pinterest) with coloured paper and PVA - yes, I prepared everything first. I also do the activity with the students so they have a model to follow.
I've since mounted these artworks and put them on the wall.
Our next focus letter is the letter T. Once again Pinterest provided some inspiration and we made turkeys. I pre-cut out all the necessary parts and demonstrated how to make the turkeys. As you can see, we had varying success or individuality.
I tweeted this picture out, and then someone tweeted back: taniwha, tui, tiki, tuatara!!!
Well we couldn't do all of them but we did do this:
I looked up taniwha images on Google and drew a taniwha on two pieced of A2 cartridge. I then did the outlines in crayon.
The children then coloured in different sections of the taniwha each.
The next day we used blue dye to make it look like the taniwha was swimming in water.
With the tui, I again drew it and outlined it with crayon. Then each child had the opportunity to colour in a section. As you can see below, we then dyed the picture.
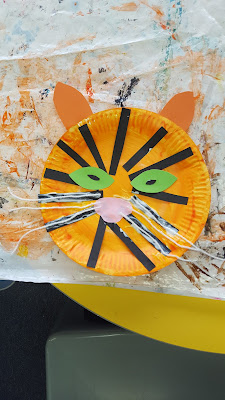
Then I prepared the things we would need for the tigers face. I cut out orange paper for the ears. I cut out green paper for the eyes and smaller black paper for the pupils. I cut out lots of black strips of paper for the stripes. I cut out pink noses. I cut a lot of white wool for whiskers. I also printed out a picture of a tiger's face.
 |
| Source: http://fortune.com/2017/02/23/tiger-drone-hunt/ |
 |
| Full disclosure: this is mine and the container of bits I prepared earlier. |
Once again, you will notice amazing individuality and differences between each tiger.
We also went outside and looked at trees, discussed trees and drew trees.
 |
| Yes, this is mine. |
Next we did the letter S and those activities (while finishing off our tigers). I bought strawberries to observe, talk about, draw and eat. I got cotton balls so we can make sheep. We planted sunflower, pea, basil and coriander seeds into seed raising trays and some sweetcorn plants directly into the garden (which we also sketched). And I envisaged letter S snakes.
We discussed the parts of the strawberry. We noted the green hat on top. That's where we went out to the gardens to look at the strawberry plants and see the flowers and the strawberries growing in the garden. We went back inside to look at the strawberries again and noted the stalk, the seeds and the colour and shape. We then sketched in pencil and used different crayons of reds, white and greens to colour in the strawberry. I made the paper A5 size and asked them to draw big.
For the S snakes, I drew the S on an A3 piece of cartridge, and then demonstrated making a pattern after drawing "a fence to colour inside of" (I did an outline). Each child choose their colour to outline their S and I did the outline and they then did their patterns inside. This is still a work in progress.
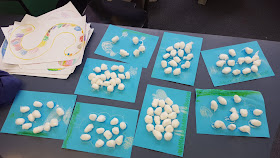
For the sheep, I drew a white "cloud" outline with a crayon on each piece of blue paper. We sat down together and I demonstrated drawing the head and ears and colouring it in. Then I showed them how to do the legs. Afterwards we had several different greens to do grass.
Then I demonstrated using my finger to put glue on the paper. I demonstrated putting a cottonball on the sheep's body. I asked them to go all around the outside first and then fill in the middle. We ran out of cottonballs.
The second day I showed them how to put a face on the sheep and then we glued on the cottonballs until we ran out again. So yes, a third session with cottonballs will be required.
I have a lot of spare seed raising trays and pots, so I pulled out enough for one each. I demonstrated putting the seed raising mix into the trays and pots. As we planted each seed we looked at it and discussed its size, shape and appearance. We talked about what a seed needs to grow.
We have just started learning about the letter D, so I see dabbing dots on a 'd', dragons and dogs in the coming days. And maybe donuts or dragonfruit.... anyone know where to buy dragonfruit in Hamilton?


Posts like this make me want to teach New Entrants too (although, I have the same rules as you with the shoes and tissues...) hmmm... maybe one day! haha
ReplyDeleteYour activities look so fun! Your class of littlies is very lucky :)