In Term 3 our schoolwide focus was World Celebrations. Our classes all approached this in different ways and one highlight was the World Restaurant one class ran with a sample of foods from different cultures. I really enjoyed this. Another colleague focused on a different celebration each fortnight and they made wonderful art to go with this and food on each of those Fridays.
We also had an Arts & Crafts week for Week 7, so I took the opportunity to really bring this unit into that has well.
I choose five celebrations to focus on:
- White Sunday from Samoa;
- Diwali from India;
- Childrens' Day in Japan;
- Chinese New Year; and
- Eid Mubarak from the Islamic religion.
White Sunday from Samoa.
I kept our first craft activity fairly simple. In the Ready-to-Read book, White Sunday in Samoa, the little boy and his friends are wearing a pale, a crown of leaves. So the children each got some photocopied leaves and coloured them in. Then they cut them out. I sized a circle of green card around their heads and stapled it to fit each child, and they glued their leaves on.
On our day of sampling celebration food, I made a raw fish salad in front of the children. I got the recipe from here.
It was a pretty yummy salad (I made sure there was a healthy helping for my lunch) and I will definitely be making it again... for me!!
Diwali from India.
I had never heard of Diwali until I did my OE in London in 2001. Guy Fawkes had just happened but the fireworks kept going off and off and off and that was my introduction to Diwali. Then in 2010, I had a student bring some treats from Diwali to school to share with the class. I may have eaten more that some of the children... but having Punjabi relatives for the last fourteen years has meant I have gotten a taste for the food.
As a class we read the Ready-to-Read book Diwali. This book covers many aspects of Diwali, including mendhi, barfi and diva.
Researching about Diwali I found that mendhi was a popular way to decorate the body for the festivities. It also turns out mendhi is pretty popular for Eid Mubarak in the Islamic culture too. I have had mendhi for when my brother got married but thought it would be fun for the children to do.
First I showed them photos on Google images.
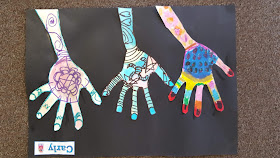
We started off by tracing around our hands and drawing designs. The first lot of mendhi we did with pastels.
The second lot of mendhi we did was initially pencil as above, and then we went over the design with black vivid before using yellow, blue, red and green dye to colour it.
Then we got to use the henna to make the designs on each other's hands. Before I did this, I got permission for each child to participate (some parents did decline or did not respond) and we did a spot test for reactions (there were not any). Each child who had permission, buddied up with another child and drew the design they had created on their buddy's hand.
I cut out all the hands and glued them onto black paper (with help from some Year 7 and 8s). The children who could not do mendhi on their hands were given the opportunity to do another mendhi with water colour paint and to use felts to zush them up.
This was our mendhi triptych display at our Arts and Crafts Week Art Museum.
We also made salt dough to make diva, the little bowls which candles are lit in during Diwali. We moulded the shape and decorated with the little plastic jewels from the $2 Shop.
This was our diya display at our Arts and Crafts Week Art Museum.
We also choose rangoli patterns to colour in with colouring pencils.
On our Celebration Food day, I got the children barfi from a local Indian shop (my sister-in-law said that making it was a bit fiddly from watching her dad make it). Barfi is a sweet made with milk powder and it is the kind of thing that when you eat the first piece, it is yummy; the second piece is good; the third piece is just too much!
Childrens' Day in Japan.
On the day we ate the food, I got the children mochi. Unfortunately I couldn't get the traditional variety with the red bean paste inside (which from my previous experience is not that yummy), so I got this very non-traditional variety with durian in it. Apparently, durian is a very pungant fruit.
Kimono can be worn on Childrens' Day. I found this funky little paper doll on the net and the children and I looked at kimonos on Google Images and then I sent them off to be kimono fashion designers.
Fish kites/flags are used to decorate the streets and festivities for Chilrens' Day. I was inspired by this website for the fish kites. So I photocopied these fish onto cartridge paper and the children dyed them.
Then they glued the scales on. The scales were cut out of wrapping paper to give a soft shiny texture.
After the fish were dry, the children cut the fish out. This was pretty big for me because I usually do a lot of the cutting out, but they all have drastically improved their cutting out since the beginning of the year. But I did do a wee tutorial before they began cutting out. I gave them some tips like cutting the paper in half and only cutting out one half at a time; holding the big part with the spare hand while the scissors chopped off the small bit of paper; cutting off the straight lines first and cutting against the black lines.
I knew I drank all that coffee and saved the boxes for a reason! I cut the boxes up to make the rings to join the fish together.
We used the stapler to put our fish together.
The next step is to thread string through and hang them up.
Chinese New Year.
We read this new Ready-to-Read in 2018 book, Chinese New Year. It sparked many of the ideas I did below.
I kind of got this idea off Pinterest... but tweaked it to make it my own.
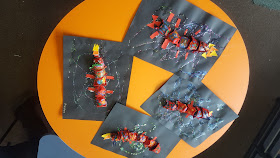
I had a pile of egg cartons, so this is a good way to use them all up. I cut them up so each child got one side of the egg carton. Their first job was to paint their bits of egg carton red. When they were dry, I supplied the children with yellow, green and light blue paint so they could put designs on their dragons. After that was dry, it was glitter time! They did patterns with PVA and added glitter to their dragons.
For the backgrounds, the children did a glitter design. First they laid out their PVA glue pattern and then they sprinkled their glitter on. I had also demonstrated glitter conservation - how to reclaim the glitter that did not stick.
I hot glued the dragon/egg carton bits to where the children directed. I burnt myself enough times that the children do not ask to use the glue gun themselves. I also hot glued on googly eyes and pipe cleaner feelers to their specifications. I then supplied them with red, yellow and orange paper and told them to make legs and fire. On another day I gave them red and yellow cellophane to add to the fire. Each dragon is more original as a result of how each child interpreted these instructions.
Putting them on the wall was a challenge. I needed to put them where little fingers will not fiddle.
Each child had also made a red envelope for Chinese New Year. In the Chinese tradition the red envelopes are decorated in gold with messages for the new year and luck and money is put in the envelopes.
I'm generous to my students, but that generosity does not extend to cash. So I found some Chinese lollies, with the durian flavour, at my local Asian supermarket and I stuffed those envelopes with durian flavoured lollies. I may have suggested that if they didn't like the flavour of the lollies to give them to a sibling, with devious kindness. Not confirming that though.
Eid Mubarak.
The children were interested to find mendhi was part of this celebration too. They were also intrigued with the shapes of the mosque rooflines.
But our art goal was to make a mobile with a crescent moon and different sized stars as seen below. I was inspired by this website.
The painting of the paper was a two step adventure. I globbed on white, dark blue and gold paint. Each child had a piece of card (cut from the boxes of all those Mother Earth Oaty Bars I eat for morning tea that I have saved) which they used to spread the paint to cover all their A3 cartridge.
This step was then repeated on the other side of the paper a few days later.
I then showed the children how to cut out each shape into a section so they could then easily cut the shape out of a small piece of paper rather than trying to cut the shape out of the whole A3 paper at once.
The next step was stapling the wool to the shapes and securing them with a knot and linking the shapes together.
And here are our mobiles hanging up... please excuse the poor lighting, but you get the idea.
One of the things we did for Eid, was acts of kindness. This fitted in well with our class ethos on Acts of Kindness. Here is a link to a good website to inspire you with this idea. I typed out the ones I liked, printed, cut them out and put them in a container. We drew out one each day and I put it up on Seesaw for the parents to also see so it became a home/school activity. I think this is an idea I will carry into 2019 to teach my students about what an Act of Kindness is.
We were going to make Eid biscuits, which I found a recipe for on Twinkl, but we ran out of time.
Conclusion.
My biggest helps with doing this unit were undoubtedly:
- Twinkl
- Google and YouTube
- Read-to-Read readers
I'm so proud of my students for the really cool artwork they have created and I hope they all have fond memories of this unit and gained some awesome learning.


