In the last few weeks I've been in a school with a schoolwide focus on Matariki. I've been given the opportunity to do art with these classes based on this theme and I have relished it. I am really proud of what the children have achieved.
The story I used for inspiration is called The Seven Stars of Matariki by Toni Rolleston-Cummins.
 |
The cover of the book The Seven Stars of Matariki by Toni Rolleston-Cummins via www.thechildrensbookshop.co.nz
|
But because I do not have a copy of the book (which I should remedy because it is a good story), I've used the video on You Tube of Toni Rolleston-Cummins reading the story.
With the first class, I had a limited time period to work with them. So I decided to use black paper, chalk and pastel. We used chalk to sketch out the part of the story they wanted to express and then used pastel to bring out the colour. I gave two important instructions before they started:
- use the whole page - I didn't want to use binoculars to see the picture or have an overwhelming amount of blank space.
- don't draw small details - keep it broad because pastels are difficult to do the small things with.
Until children have a lot of experience with pastels, they really do not understand how difficult or important the second instruction is.
I did use pictures from this blog, Matariki - an overview of a unit of work, to inspire them from a unit I did with my class I had in 2012.
 |
| This is pastel on black paper, inspired by a story from Melanie Drewery's book Stories from our Night Sky. |
I only had a small amount of time to work with this class, but when I came back a few weeks later, I was thrilled to see they had negotiated with their teacher to use glitter to take the story to the next level. So I have taken some photos to share.
I think that the glitter just gives these stories an extra jusshhh and make them so much more eye catching as you look around the class.
So on Friday I thought I would step it up and do something different. The children were mostly younger, but I had more time to go through the steps. My big instructions at the beginning when we started drawing after watching the same video were:
- draw a part of the story that speaks to you.
- take up the whole piece of paper.
- don't draw little details.
- be creative - use your inner artist and every artist sees things differently from another.
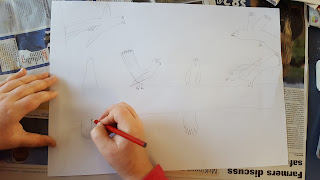
This time we used white paper. I could not locate the yellow chalk this time, which is better to use under pastel than pencil, so we had to use pencils instead and I asked them to press lightly so that it would be harder to see the pastel. This is what the initial pencil drawings came out like:
 |
| We used the Chromebooks and i-Pads to help us draw fantails. |
After morning tea I did a demonstration with the pastels. These were the key ideas I wanted them consider during the pastel phase:
- colour the background in first and do the smallest details last to make them pop.
- don't let pastels drop on the floor and, if they do, pick them up as we don't want pastels ground into the carpet.
- don't break the pastel on purpose.
- how the pressure you apply to the pastel will determine the darkness or solid looking colour.
- the effect of mixing colours to create texture, drama and the right colour.
- Have newspaper under the artwork when using pastels.
- Use the newspaper to clean off pastels when they have other colours on the end.
- Use the newspaper to check the pastel colour or how the colours will work together.
When I teach art, I usually always do my own piece of art too. This allows me to demonstrate the skills I want to teach and gives me the opportunity to sit down and communicate with the children at their level, in a non-threatening way. I can also do the "What do you think I should do here?" strategy when required. So here are photos of my progress through the art:
 |
This was where I demonstrated colouring the background first and how I
showed the children how to use multiple pastels to get the look right.
|
 |
When I coloured the tree, I used multiple shades of brown and did
not colour in a solid block.
|
 |
Each time I added a new shade, I went over the white gaps on the
tree. When I had used all my colours I went back over it again to
fill in spaces.
|
 |
As I coloured in the fantails, I had an i-Pad beside me so I could
check the colouring and markings.
|
So I took some photos as we progressed through the colouring...
And this lot are the ones which were completed at the end of the day:
 |
Note that this child has scratched a pattern into the skirts of the
patupaiarehe after a discussion about how she could enhance and
show the pattern she had in her original sketch.
|
What really impressed me about this group of children was their ability to take feedback and use it to improve their pictures. They demonstrated perseverance and had stamina. These finished pieces show their perspective, their creativity. Some of them have been able to give the illusion of movement, some texture. They used the techniques we discussed. And because I loved their work so much, I had to share it.


